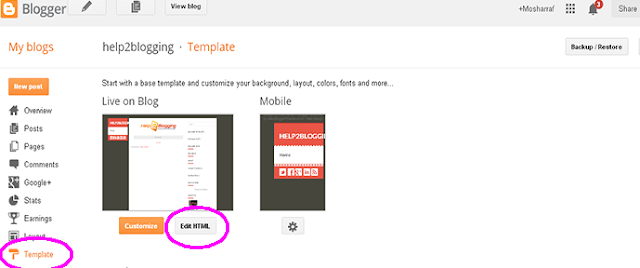
Now
create a backup of your blogger template because if you have any wrong
this template after edited, you can restore this. So click on Backup /Restore and download Full Template.
- Click anywhere inside the code area and press the CTRL + F keys on your keyboard to open the Blogger' search box.
A. Write Search box then hit enter your keyboard and find this tag
]]></b:skin>
/* -----
help2blogging three column footer widget With two style---- */
# h2b {
margin:auto;
padding: 0px 0px 10px 0px;
width:
100%;
background:#333434;
}
#h2b-wrapper {
margin:auto;
padding: 20px 0px 20px 0px;
width: 960px;
}
# h2bbar-wrapper {
border:1px solid #DEDEDE;
background:#fff;
float:
left;
margin: 0px 5px auto;
padding-bottom: 20px;
width:
32%;
text-align: justify;
font-size:100%;
line-height: 1.6em;
word-wrap: break-word;
overflow: hidden;
}
.
h2bbar {margin: 0; padding: 0;}
.
h2bbar .widget {margin: 0; padding: 10px 20px 0px 20px;}
. h2bbar h2 {
margin:
0px 0px 10px 0px;
padding: 3px 0px 3px 0px;
text-align: left;
color:# 007F74;
text-transform:uppercase;
font:
bold 14px Arial, Tahoma, Verdana;
border-bottom:3px solid #0084ce;
}
. h2bbar ul {
margin:
0px 0px 0px 0px;
padding: 0px 0px 0px 0px;
list-style-type: none;
}
. h2bbar li {
margin:
0px 0px 2px 0px;
padding: 0px 0px 1px 0px;
border-bottom: 1px dotted #ccc;
}
 Note:
Note: 1- Change background:#333434; to customize backside the footer background
2- Change width: 960px; customize your width of the widget
3- Change border:1px solid #DEDEDE; customize
your widget outside background color
4- Change background:#fff; customize
your widget background color
Step 2- Add Three Column Footer HTML Code in Blogger:
B. Past the bellow code before this tag
<div id='h2b'>
<div id='h2b-wrapper'>
<div id='h2bbar-wrapper'>
<b:section class='h2bbar' id='h2bbar1'
preferred='yes'>
</b:section>
</div>
<div id='h2bbar-wrapper'>
<b:section class='h2bbar' id='h2bbar2'
preferred='yes'>
</b:section>
</div>
<div id='h2bbar-wrapper'>
<b:section class='h2bbar' id='h2bbar3'
preferred='yes'>
</b:section>
</div>
<div style='clear: both;'/>
</div> </div>

- But you can need this column before footer-wrapper please find
<div id='footer-wrapper'>
<div id='footer'>
or
<div class='credit'>
<div class='credit-wrapper'>
- And past above code before this tag
- That's all.
Second Style Adding 3 Column Footer Widget in Blogger:
- Here I share other one style.
- You can add this code just only replace Step 1 after of course add Step 2 code then enjoy
/* -----
help2blogging three column footer widget ----- */
#h2b {
margin:auto;
padding: 0px 0px 10px 0px;
width:
100%;
background:#333434; }
#h2b-wrapper {
margin:auto;
padding: 20px 0px 20px 0px;
width:
960px;
}
#h2bbar-wrapper {
border:1px solid #A1FF28;
background:#007F74; float:
left;
margin: 0px 5px auto;
padding-bottom: 20px;
width: 32%; text-align:
justify;
font-size:100%;
line-height: 1.6em;
word-wrap: break-word;
overflow: hidden;
}
.h2bbar {margin: 0; padding: 0;}
.h2bbar .widget {margin: 0; padding: 10px 20px 0px 20px;}
.h2bbar h2 {
margin:
0px 0px 10px 0px;
padding: 3px 0px 3px 0px;
text-align: left;
color:#FFFFFF;
text-transform:uppercase;
font:
bold 14px Arial, Tahoma, Verdana;
border-bottom:3px solid #FFFFFF; }
.h2bbar ul {
margin:
0px 0px 0px 0px;
padding: 0px 0px 0px 0px;
list-style-type: none;
}
.h2bbar li {
margin:
0px 0px 2px 0px;
padding: 0px 0px 1px 0px;
border-bottom: 1px dotted #ccc;
}
-------------------------------------
If you have any question and suggestions related blogger
Thanks to follow this tutorial
Best regards
help2blogging team


Comments
Post a Comment